1.) If you have a Weber pilot seat with inop functions such as recline, fore/aft or up/down, it is usually easy to fix. Take a look at the picture: #1 arrow shows the tube which connects the adjustment handle to the actuator. The tube holds oil, which when the handle is moved, moves the release so the seat will move. If the oil is low...it won't work. Arrow #3 shows the piston housing. The small piston inside exerts pressure in the tube when the handle is moved. At the opposite end of the tube, not shown, there is a screw as in figure 3. Remove the upper screw. Loosen screw, arrow #3. Use an oil can with a tiny opening, and also with a trigger to exert oil under pressure into the upper hole, so that it leaks from the lower hole, #3. It will go, no hard work. All you have done is re-fill and bleed that line. Tighten screw #3, replace upper screw...voila', your seat works. If it is easier to remove the lower screw, it makes no difference, as long as you loosen one and remove the other.

2.) Korry light disassembly...remove the plug in light, look into the hole. You'll see an Allen head. Voila'...unscrew it and it all comes apart.


3.) Removal and re-installation of belt segments:
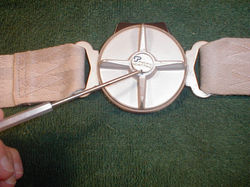
 a) Use a sharp probe to remove cap... |  b) Use an Allen wrench to loosen center bolt. NOTE: IT TURNS BACKWARDS...RIGHT to loosen. As it unscrews, the cap and nut will raise up and leave the bolt in the buckle. No fear of stuff jumping out...BUT DON'T LOSE THE 3 BALL BEARINGS! |  c) Note the position of the cap indentations that hold the bearings. |
|---|---|---|
 d) Press down on the spring cams to remove belts. |  d) Press down on the spring cams to remove belts. |  e) Reverse process to install new belts, making sure the cap is positioned right to hold the bearings. f) TURN LEFT to tighten center bolt until it stops. Then TURN RIGHT 1/8th turn so the release works smoothly. g) Replace logo cap, and press into place using a small socket and rubber hammer. |
4.) If you need gray paint to match the paint scheme in your sim, you have a choice. Either spend a lot to have it computer matched and then apply it with a professional gun in a safe place so you're not arrested for polluting the environment, all while breathing through a full face mask with its own air supply, or; spend 3 bucks a can at Walmart and use Krylon Auto Primer. Goes on easy, covers well, dries in a minute. Overcoat with Krylon "matte finish", which adds a very low shine. The match is nearly exact and it can be done legally in your shop. It also patches well if you get a scratch or flaw. No, Krylon does not give us free paint...we pay full price.

5.) To change a Boeing control column from a left to a right:
Thank you to Thomas Rinnerhofer for the pictures and tip.
 a) Remove the control wheel and mounting gear. Don't worry, you can't hurt either and they re-install easily. |  b) Remove the 4 large Phillips screws in the column head and push out the shaft from the bottom side; see photo A. |  c) You then can turn the head and replace the screws and gear. If you have a full column, you'll have to remove the small tab at the bottom while you work; photo B, showing tab has been removed. |
|---|---|---|
 d) One problem in changing the direction is the channel for the wiring inside the column. The inner tube needs to be mounted on the opposite side to have the correct fit and location of the wiring loom. |
6.) How to remove trim wheels from 707,737,737
A rod goes all the way thru held on with a flat nut with a screw driver type slot. Use a big common screw driver to hold the center weird nut thing , #1, on one side to keep it from turning. On the other side use the screwdriver to unscrew the nut. The rod, #2, comes right out. Pull the wheels off of the splines, no danger, they just slide off. 5 minute job.

7.) MD-80 front leg extension. Allows seats to sit flat and still utilize normal rails.


8.) Boeing panel painting, thanks to Mike O'Brien:
-
With regards to Boeing grey cockpit paint, I've been getting RAL-7011 spray paint from PC Flights: http://pcflights.com/index.php?main_page=product_info&products_id=251. It's a little pricey but seems to be the best balance between the various shades of grey and is the closest thing I've found to the OEM shade (at least on my panels anyways, looks like they seem to vary). I've been very pleased with the results.
-
To get the matte look I've been using Testors Dullcote. Tried the Krylon matte clear coat and it doesn't look as good, almost a little yellow. But the Testors Dullcote over the RAL-7011 looks fantastic, very close to OEM.
-
For the black screws I use Krylon Matte Black (2754) with a coat of Testors Dullcote. You can take a piece of cardboard and poke holes in it with a screw driver or awl and insert the screws through them to paint a bunch at once and mask the threads from the paint.
.jpg)

